This is the second article in a 3-article series on the technology behind Libra. The first article is an overview of Libra and its smart contract programming language Move. In this piece, we will deep dive into the technology stack and use the source code to show what happens behind the scene when users interact with Libra. Taking “getting Libra coins” as an example, let’s examine how Libra Client and Validator Faucet process and run a transaction.
This article is researched by Hydai from Second State, a VC-funded, enterprise-focused, smart contract platform company. We are still in stealth mode while making contributions to leading open source projects. We are launching our first products soon.
Interacting with Libra
We can explain the relationship between Libra Client and Validator through the following diagram from the Libra Technical White Paper.
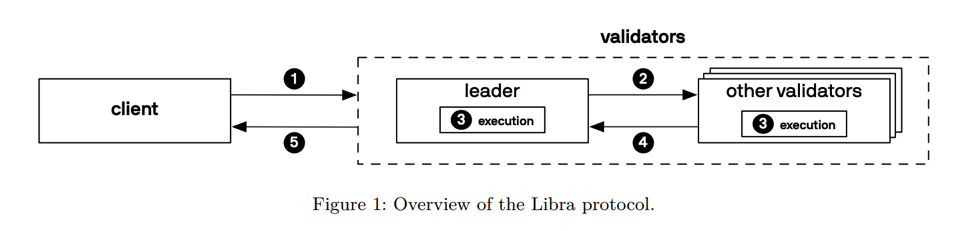
Libra has two categories of blockchain participants: Client (User) and Validators (LibraBFT consensus nodes). An average user needs to submit the transactions and database queries to Validators through the Client.
Request Libra Coin from the faucet
-
Start Libra client and wait for Libra CLI to be connected to testnet. Libra CLI shows
libra%and is now ready for user commands. -
When a user enters
account mint <MyAddr> <NumberOfCoins>in Libra CLI to mint some coins, Libra CLI will package the current sender<MyAddr>, the minting operation’s transaction script (libra/language/stdlib/transaction_scriptsmint.mvir), and the quantity to be requested into a transaction (see the reference part below for the transaction format). -
The Libra client submits this transaction to the validator after signing it.
-
When the Validator receives the transaction, it will be placed in the mempool and shared with other Validators.
-
Validators’ governance design is LibraBFT: Each validator takes turns to act as a leader. The leader picks up the transactions he wants to execute from mempool into the proposed block and broadcasts it to other validators. Wait until 2f+1 validators to vote for this proposed block, the Leader will make a quorum certificate and broadcast it to all validators.
-
At this moment the transactions in this proposed block will be executed and committed on the versioned database.
How does the validator execute a Transaction
Libra designed a Move VM specifically for Move Language. When a validator executes a transaction, it uses the Move VM! Let’s see how. There are 6 steps: Check signature, prologue, verify, publish module, run the transaction script, and finally, epilogue.
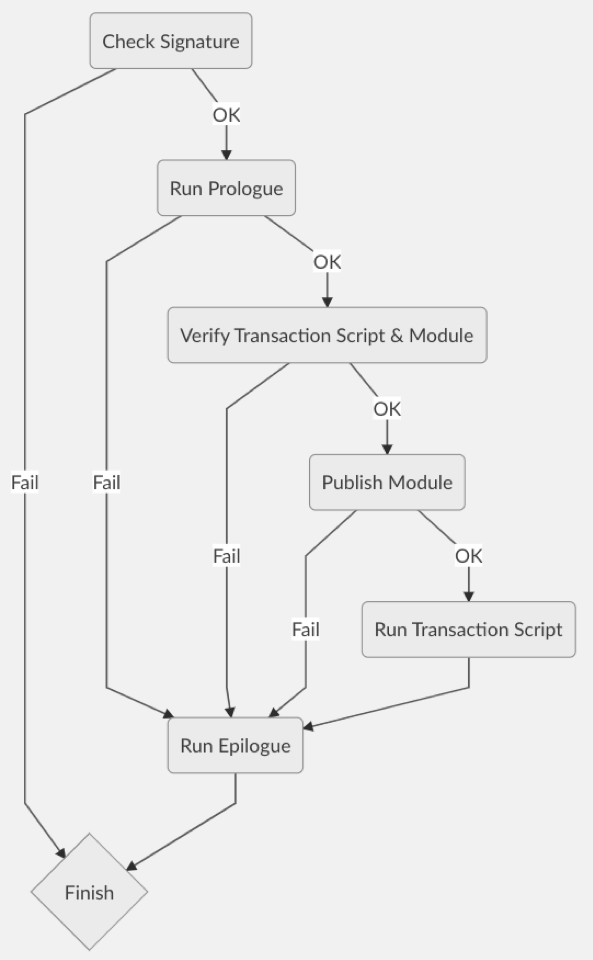
Check Signature: Check if the Transaction Signature matches the Transaction Data and the sender’s public key. At this stage, it just verifies the transaction details. It has not yet interacted with the versioned database and Move VM.
Run Prologue:
There are three checks in the following order:
-
Check if the sender public key in the Transaction is the same as the authentication key held by the sender account in the database.
HASH(Sender Public Key) == SenderAddr.LibraAccount.T.AuthenticationKey -
Check if Sender has enough Libra Coin to pay for Gas Fee
TX.gasPrice * TX.maxGasAmount <= SenderAddr.LibraAccount.T.balance -
Check if the sequence number of the transaction matches the sequence number of the sender account in the current database.
TX.SequenceNumber == SenderAddr.LibraAccount.T.SequenceNumber
All checks are performed by executing the procedure prologue() of built-in module 0x0.LibraAccount.
Since the prologue() work is required by the system, Libra does not charge a gas fee on the 0x0.LibraAccount.prologue() procedure, even as prologue() is executed by the Move VM.
Verify Transaction Script and Module: Security is a top priority in designing Move. To ensure security, the VM uses the Move bytecode verifier to check the transaction script or deployed module to ensure the security of type, reference, and resource.
Publish Module: IF there is a module to be deployed, then deploy module to the sender address at this stage.
Run transaction script: The Move VM ties transaction parameters and the arguments corresponding to this transaction script. Then run the script.
If successful, events will be generated and the result will be written back to the global state.
If it fails (including out of gas, execution error, etc.), the modification to the global state will be reverted.
Run Epilogue: Success or failure, the VM will execute this step for all transactions.
The Move VM calls the built-in module 0x0.LibraAccount’s procedure epilogue():
- Charge the gas fee:
SenderAddr.LibraAccount.T.Balance -= TX.gasPrice * TX.gasUse - Adjust the sequence number:
SenderAddr.LibraAccount.T.SequenceNumber += 1.
Similar to the prologue(), even though LibraAccount.epilogue() is run via Move VM, the sender won’t be charged any gas fee for the epilogue() itself.
A concrete example
Now we have seen how the transaction is processed by the validators. Let’s use a complete example to demonstrate how to mint or create some Libra coins on the testnet. The process starts from the Libra CLI (Command Line Interface).
When we start the Libra CLI, it goes through the following process to initialize the client and allow the user to enter commands to interact with Libra testnet. In this section, let’s review how the CLI processes the account mint <address> <number of coin> command.
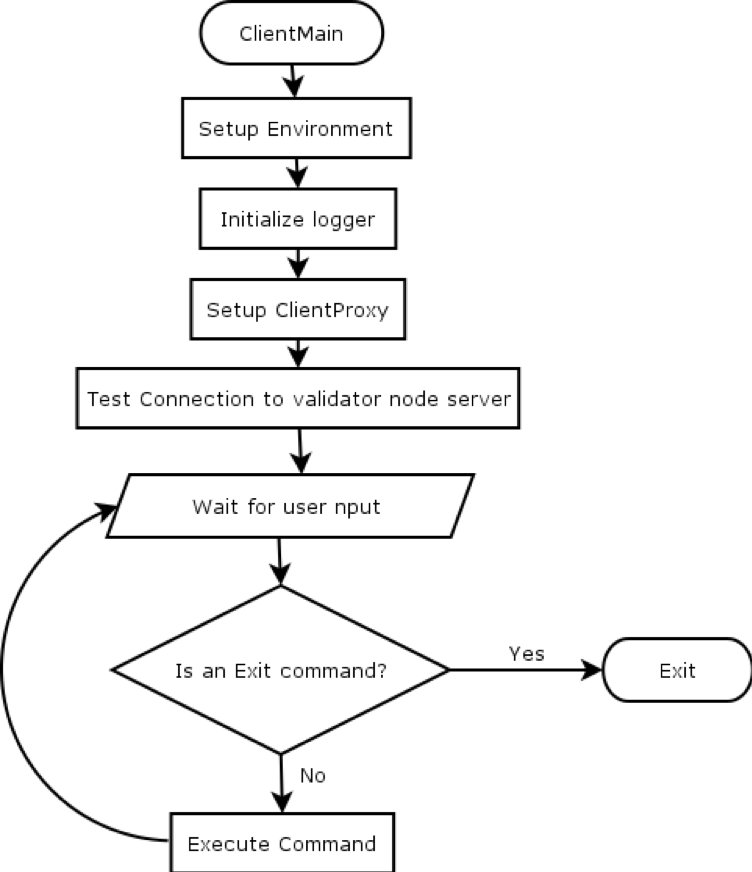
Before the user sees the input prompt of libra %, the Libra CLI loads the genesis, faucet account, local account and other information from the configuration file, and starts the ClientProxy. In subsequent operations, the user’s instructions are wrapped by ClientProxy, the corresponding transaction being composed and sent to Libra’s validator.
LibraCommand
When the user wants to request 100 libra coins for their first account, he enters account mint 0 100 and the Libra CLI will parse the entire input string and send it to LibraCommand for executing.
The account keyword in the string means that command will call LibraCommandAccount::execute() to execute mint 0 100 . When LibraCommandAccount identifies keyword mint in the command, it calls subcommand LibraCommandAccountMint::execute() with 0 100.
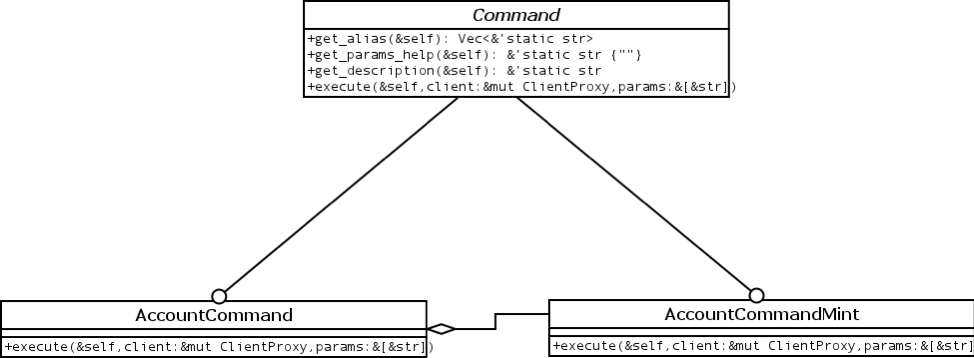
ClientProxy
But AccountCommandMint::execute() does not directly send a transaction to the libra validator. Instead, it goes through the Libra CLI’s most important element: ClientProxy. Let’s take a look at the process!

AccountCommandMint::execute() sends 0 (the first account), 100 (the number of Libra coins) to ClientProxy::mint_coins().
The ClientProxy will first confirm whether there is a faucet account on the local machine.
If the local machine does not have a faucet account, ClientProxy calls the mint_coins_with_faucet_service() method and wraps mint 0 100 into a url (https://<faucet server>?amount=100&account=0) to send the request to a remote faucet server.
When there is a local faucet account, ClientProxy uses a completely different path to execute the mint request and call ClientProxy::mint_coins_with_local_faucet_account() instead. At this point, a Libra transaction will be created:
- The
vm_genesis::encode_mint_program()method loads themint.mvirtransaction script written in the Move language underlanguage/stdlib/transaction_scripts. - The
ClientProxythen callsClientProxy::create_submit_transaction_req()to include information such as transaction script, sender address, gas price, max gas amount into the Libra transaction. - Finally, the
ClientProxyusesGRPCClient::submit_transaction()to send this transaction to the validator.
If the user requires the transaction to complete before returning account mint 0 100, ClientProxy will call wait_for_transaction() and display “waiting …” until the transaction is completed.
What’s next
In this article, we demonstrated how Libra processes a transaction through a review of its source code. In the next article in this series, we will create new Libra modules to support our own coins on the Libra blockchain. Stay tuned!
References
Transaction Format
Libra defines in detail that a Transaction should have the following fields:
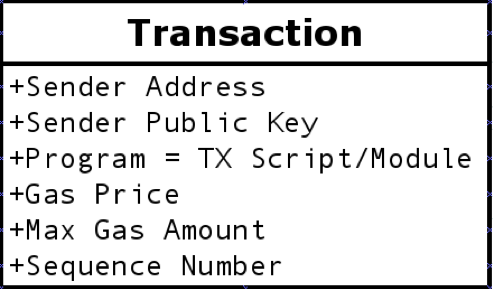
-
Sender Address: The sender’s address that will be used to query the Libra account for this Address in the ledger.
-
Sender Public Key: The sender’s public key, which will be used to verify that this Transaction is signed by Sender; and to check if this public key matches the authentication key retained by LibraAccount in Address.
-
Program: Move Module or Transaction Script.
-
Gas Price: The gas price for this transaction.
-
Max Gas Amount: The Gas limit for this transaction.
-
Sequence Number: This needs to match the LibraAccount.T.SequenceNumber in the current Address. It is the verification field used to check for attacks such as a replay attack.
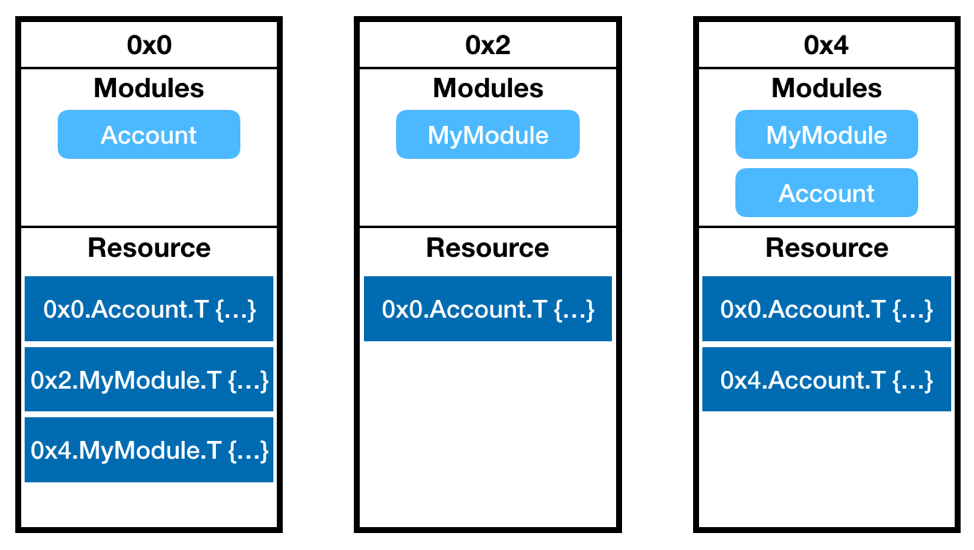
Libra Storage Layout
Each Address has a Module section and a Resource section.
Each Address can have multiple Modules. The only restriction is that there can only be one Module with the same name in the Address. In the following figure, for example, 0x0 already has the Account module. When the user tries to publish another Account module to 0x0, the transaction would fail with an error.
In Libra, each Address has an independent namespace. Therefore if a module is deployed in different addresses, each module deployment has a different name. For example, in the figure below, even though 0x0 and 0x4 have the same account module, 0x0.Account.T {…} and 0x4.Account.T {…} are entirely different resources.